Template example
In this example, we will create a template for ticket mail notifications.
In the end, this template can be used for several ticket events:
New ticket
Add followup
Add task
Resolve ticket
…
Create template
Go to Setup > Notifications > Notification templates
Click on Add button
Fill in fields
Name:
Generic tickets with timelinefor exampleType:
TicketComments:
Generic template for tickets, using timelinefor exampleCSS: leave empty for now
Save to be redirected to the template translation
Basic data
We are now in the editing mode of a template translation.
Language:
Default translationThe minimum required. We will see later how to add other languages.Subject:
##ticket.action##: ##ticket.title##« [GLPI <ticket_number>] » will be automatically added to the email subject
Note
##ticket.action##: action that triggered the notification##ticket.title##: ticket title
Email text body: leave empty to be filled automatically
Email HTML body: this is the field that we will mainly modify in the next chapters
Case: New ticket
Let’s start by adding some basic data. You can add more by using the « Show list of available tags » button to display the available tags.
Email HTML body:
##ticket.action##: ##ticket.title##
##lang.ticket.status##: ##ticket.status##
##lang.ticket.url##: ##ticket.url##

##lang.ticket.description##:
##ticket.authors## - ##ticket.creationdate##
##ticket.description##
Note
##lang.ticket.status##: text « Status » automatically translated into the recipient’s language##ticket.status##: ticket status##lang.ticket.url##: text « URL » automatically translated##ticket.url##: ticket url##lang.ticket.description##: text « Ticket Description » automatically translated##ticket.authors##: ticket requesters separated by “,” if there is more than one##ticket.creationdate##: ticket creation date##ticket.description##: ticket description text
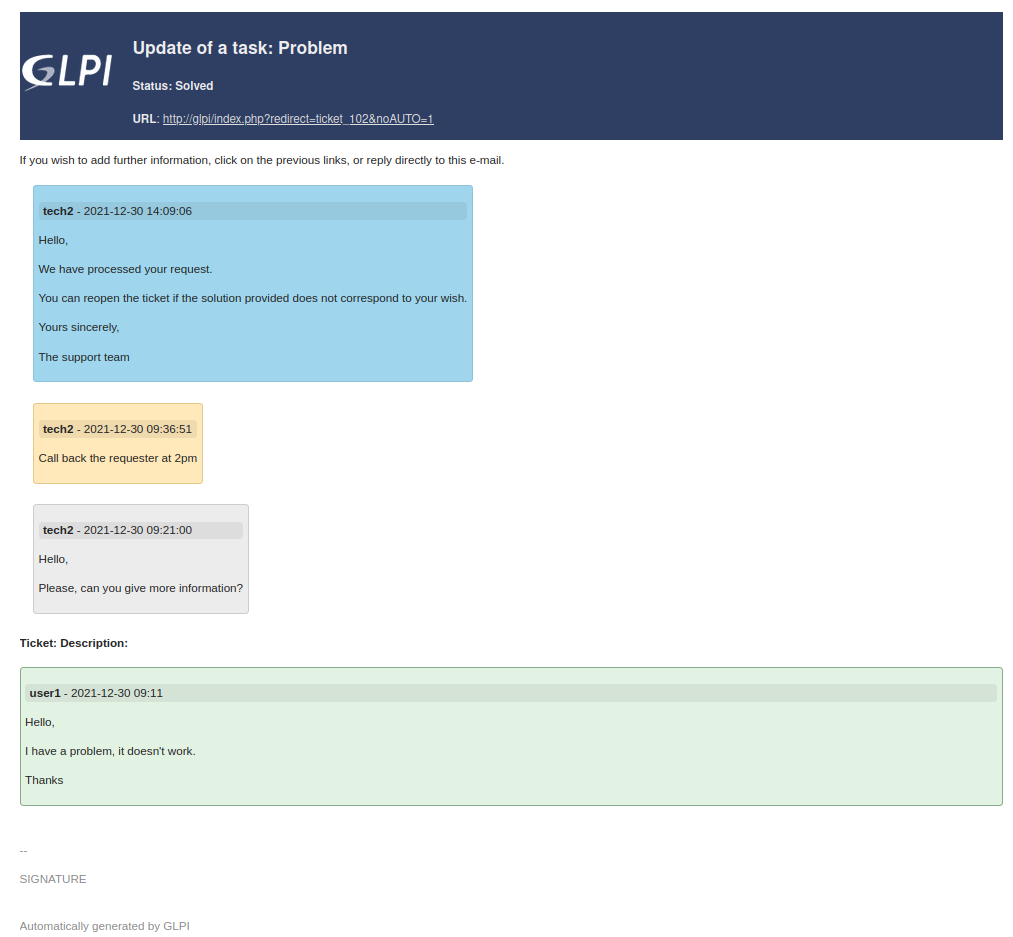
Case: Add followup, Add task, Resolve ticket
Follow-ups, tasks and solutions are elements of a ticket’s timeline, so we’ll loop through « timelineitems » using FOREACHtimelineitems.
Email HTML body:
##ticket.action##: ##ticket.title##
##lang.ticket.status##: ##ticket.status##
##lang.ticket.url##: ##ticket.url##

##FOREACHtimelineitems##
 ##timelineitems.author## - ##timelineitems.date##
 ##timelineitems.description##
##ENDFOREACHtimelineitems##

##lang.ticket.description##:
##ticket.authors## - ##ticket.creationdate##
##ticket.description##
Note
##FOREACHtimelineitems##: loop over all timeline items##timelineitems.author##: author of the timeline item##timelineitems.date##: date of the timeline item##timelineitems.description##: description text of the timeline item##ENDFOREACHtimelineitems##: end of the loop
Layout
For now, we have only retrieved tags but there is no formatting yet.
Put in bold
Select text : e.g.
##ticket.authors##Click on Bold button
Clickable link
Select URL text : e.g.
##ticket.url##On right-click menu, click on Link…
Fill in the field URL =
##ticket.title##You can leave the other fields unchanged and Save
Add headings
Select text : e.g.
##ticket.action##: ##ticket.title##Click on the format drop-down list and select Headings > Headings 1
Add a logo
Without selecting any text, click on the place where you want to put your image
Click on Insert image button
Browse to add your image
If necessary, you can resize via right-click menu > Image…
Add a table
This table will allow us to display the logo at the same row as the ticket title and its URL.
Without selecting any text, click on the place where you want to put your table
Click on Insert table button
The generated table has 2 columns and 2 rows, we only want one row, so delete one:
Right-click on the generated table
Clic on Row > Delete row
Select the previously added image, to drag and drop it into the left cell
Select the text of the tags below, to drag and drop it into the right cell
##ticket.action##: ##ticket.title##
##lang.ticket.status##: ##ticket.status##
##lang.ticket.url##: ##ticket.url##
Right-click on table > Table properties
In Advanced, click on Background color field to select Dark Blue
Click on Save button
Change colors
As the background of the table is dark, we will write in white to be more readable.
1. Select the text in the table 3. Click on the Text color drop-down list and select the color White
Add conditional emoticon
If the ticket is in pending status, we want to display an emoji.
Add 2 test tags:
##IFticket.storestatus=4####ENDIFticket.storestatus##Right-click between the 2 tags > Emoticon
Add emoticon named Pause button
Translations
So far, we have only used ##lang....## tags which are automatically translated.
So we could be satisfied with a single translation in the Default translation language.
Let’s take the case where we have users who only understand one language (English, French or Spanish). And we want to add a text under the URL that everyone can understand:
If you wish to add further information, click on the previous links, or reply directly to this e-mail. English
Si vous souhaitez ajouter des informations supplémentaires, cliquez sur les liens précédents, ou répondez directement à cet e-mail. French
Si desea añadir más información, haga clic en los enlaces anteriores, o responda directamente a este correo electrónico. Spanish
In the Default translation we add the English text
Remember to Save
Right-click in « Email HTML body » field > Source code
Select all the code to copy it
Go back to the template header by clicking on the Notification templates value at the top
In Template translations tab click on Add a new translation button
Select Language = Français
Right-click in « Email HTML body » field > Source code
Paste the previously copied code
Save to exit code view
Updates the fields:
Subject =
##ticket.action##: ##ticket.title##In Email HTML body replace English text with the French text
Save
Repeat steps 3 to 12 for all useful languages.
Going further with HTML and CSS
Avertissement
Part for people already familiar with HTML and CSS.
Everything we have done in the « Email HTML body » field is converted into HTML code which you can edit via right-click > Source code. So if you are familiar with HTML, you can edit the code directly. Depending on the case and your skills, this is sometimes easier.
The following code repeats what we did earlier by separating the CSS layout from the HTML and adding colors to the timeline items. It is not explained, it is just an example.
Code in « Email HTML body » field
<table class="header" border="0">
 <tbody>
  <tr>
   <td class="logo">
    <img src="data:image/png;base64,iVBORw0KGgoAAAANSUhEUgAAAGQAAAA3CAYAAAD6+O8NAAAAGXRFWHRTb2Z0d2FyZQBBZG9iZSBJbWFnZVJlYWR5ccllPAAABWVJREFUeNrsWz9PG1kQX5Ot0tyeUkf4GlqckjQ4ob0I8wliX3cVcHWkEIk2IXwC4BNAlLR3mCaULGXSxCeflCZWNk1OusaZQbOJsd+/eW92jU5vpKeFxX7vzfzmz2/eLkkSJUqUKFGiRIkSJcr/XhpVLzAej9tTt8rfBzRQ8kajUTDnbcElm7jFnkMzbxMuTcZXBrDuQMg2uZTRmzA6MHZgHMM4HfPkA3O9rmKOYwE9WmM/+YB7Yq61pdIhDfAiRHedrlmgLZrMz68r7mUCvtUJ2P8B2GUTrhuOEaPSIUm5ngmXxxNpR0oKAQALgX0sB34f0+gF2OkXh/Sp0uEydQABPW8LxqaHFxaUF88mfr66DxvOAxWfUUYAkExoDkyfDzwAGdjA6FB+5ObTPSq6VZCEpmbdrsDcn8dy0vWoVW1tVMA4YG7gVDuhMGtjKcOb29mwZKOuAcQLDx0y3UIXzIioHAgLO1ErUwPQ5O06UJocHfBvC4p6carJ0So5gXEP6kG/xt5JaXiJHkQzb9/yd6yFh0z2qNKhPwMIFSNXMA5hMxtVGcIgqzplAqUdwNxeMebU6VBcAwSbOgad7QMQvRt04iDhFD8p7uUSUeQYIZffAaFUtclQfp5gtCuivC02Db3eKIusVUbIFoOD7/ue3QgUdN0eJfajMurfAQZWplIDeNcAeczY+OEco6NVMyCuzeu65n7OKPRXOqTUwLmGXO4THbDGElzuwrhD10kZwXgH854HnHnlgZHX8q1N5PFdja0KVx1Ku6bMc6m+o4J3yZuXaNhkBb6zBtcXsLGvXEAEmF4WALTulPnIJxIRkEXGxr8YQEDvv4/GpUjgCoL4O4znzMM/Ccrb4gJN9UzXJhSG1L5sisSU0XdolYfNrRAYZQoaEShcYJY8PFmC8mYavY7J04spD8c+omOIrJ4BTNV3ziYBkehmMf+fGyKnTGErLukO5hvWTHlXNfc7Cf8ZCTbMJ74N6IJAD2ADa4THCzAwhHcdPj+cA+WVOHYvweh50PZ8EpCzujgrGXtk+Mj7OVFeiUcFzxxOL6w6pEyFVgPppa2uvPXw4kHgnpqhUUFguOzDSHlLQDgsBY+oswCaed/wt6GlF2nZlBFsCCdze65JMVi7Tpi2sDafKSoERs4ZYYvHLDueypuK+pHlu4vSDaEljfSo7knKso0llkV9nzHpps/DIGr87hiK4dDDu6qivIMKwLBS3u+A0OIDxqTHTDAQiF8NYJx7erIEIVmtiCh4sdRJ2rvNrCUHjmDcpg78dgAYdTeF4szTkFX6SkComXnJWKNLLzZkFjD+SGYPFFlgGJ5rV1lDpMXpAHNhirFsJ7zjdTSU8jVKSlMqMPDwcJcRGfOgvP0KANFR3lwLCH2gxwQFjXVAb59s0VsrWMCfKMAYEhhDCe+qkPIWNQEys/9Uo2gPjIp5dI9xrNCkz+/RQh+pK/8E4z8Yb2De157KLGo8/IJhvJwygAvQeQWALHsDUjIvUBhD92mifgBjA2faI5Zgvt+S2cPAgupJ4eHJnPzfVhCXrEaGlYnVQHp9c0/4VUvn10Cl1lXMq/q3idMq0NBsacdEexNDtGCjtA3jZ/h1g2pMVZ7EKeoccS3UderVd05ZBnCQHp/QY9qnyY9n5Wi0Wwn/fz1cQjdPwunpkWPxflWR8Yspxxqo9G54hB4a/9HUuRRS2Nf47GOKUrqAk8/h7ccbK40AILCf+AvGn5YXE6JIAkLdNp5DrdEtjAKkr5cRiBoBISAQhId0DoVp6S2A8D6arUZApoD4F1MS5flRNFfNgNAbfJie/onRcAOkqv8LjBIlSpQoUaJEiRJlvvJNgAEAqG9GVu+GoEcAAAAASUVORK5CYII="
      alt="GLPI" width="100" height="55" /></td>
   <td class="title">
    <h2><strong>##ticket.action##</strong>: ##ticket.title##</h2>
    <h4>##lang.ticket.status##: ##ticket.status## ##IFticket.storestatus=4##⏸##ENDIFticket.storestatus##</h4>
    <strong>##lang.ticket.url##</strong>: <a href="##ticket.url##">##ticket.url##</a>
   </td>
  </tr>
 </tbody>
</table>
<p>If you wish to add further information, click on the previous links, or reply directly to this e-mail.</p>
<p>##FOREACH LAST 5 timelineitems##</p>
<div class="timeline ##timelineitems.type##">
 <p class="attributes"><strong>##timelineitems.author##</strong> - ##timelineitems.date##</p>
 <p>##timelineitems.description##</p>
</div>
<p>##ENDFOREACHtimelineitems##</p>
<h4>##lang.ticket.description##:</h4>
<div class="request">
 <p class="attributes"><strong>##ticket.authors##</strong> - ##ticket.creationdate##</p>
 <p>##ticket.description##</p>
</div>
Code in « CSS » field
.header {
   width: 100%;
   background-color: #2f3f64;
   color: #eeeeee;
   border: none;
}
.title {
   padding: 10px;
}
.title a {
   color: #dddddd;
}
.attributes {
   background-color: #1111;
   border-radius: 4px;
   padding: 0 5px;
}
.timeline, .request {
   padding: 5px;
   border: thin solid;
   border-radius: 4px;
}
.timeline {
   margin: 5px 15px;
   display: inline-block;
}
.ITILFollowup {
   background-color: #ececec;
   border-color: #cccccc;
}
.TicketTask {
   background-color: #ffe8b9;
   border-color: #e5c88c;
}
.ITILSolution {
   background-color: #9fd6ed;
   border-color: #90c2d8;
}
.request {
   background-color: #e2f2e3;
   border-color: #87aa8a;
}